Multi HTTPS sub domain with Traefik and Docker - Part 1
Today I’ll show you how to make several Docker containers accessible via automatic HTTPS with Let’s Encrypt on different sub domains. I assume you are already familiar with Docker, if not I recommend you to read the following getting started guide, especially the first three parts.
Traefik
We will use Traefik. So first what is Traefik? According to its website:
Traefik is a modern HTTP reverse proxy and load balancer made to deploy microservices with ease. It supports several backends (Docker, Swarm mode, Kubernetes, Marathon, Consul, Etcd, Rancher, Amazon ECS, and a lot more) to manage its configuration automatically and dynamically.
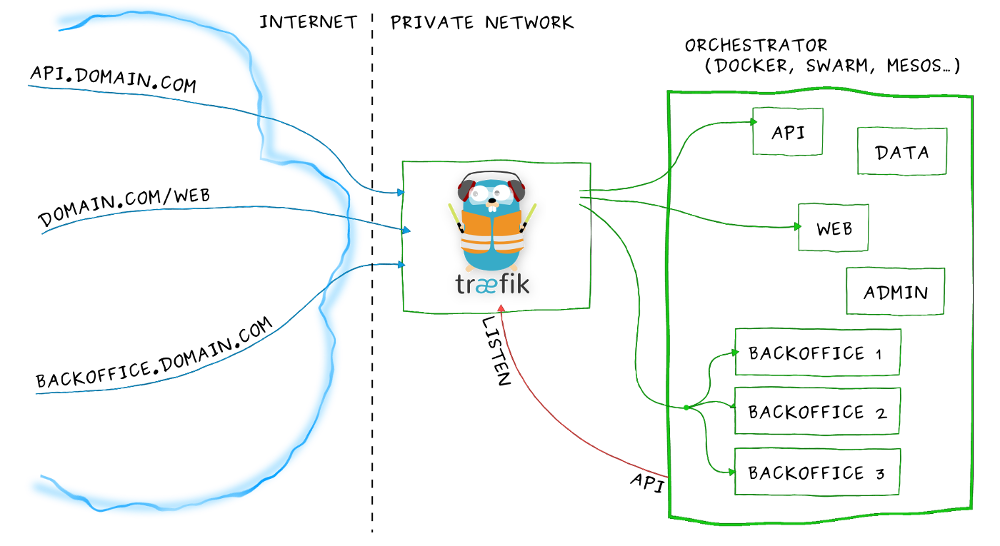
In our case, we will principally use the reverse proxy feature, and the automatic configuration. That means the right redirection from the sub domain to the right Docker.
Prerequisites
In order to follow this guide, you will need a server and a domain name. You can of course test Traefik on your local computer, but this is intended to real sub domains.
So I will consider that you have already:
- a running and accessible server
- a domain name and some sub domain names all pointing to your server IP
- a working installation of Docker
Let’s dive into it
For the first example I’ll just create a basic web server using nginx. We’ll create the necessary directories
$ mkdir -p server/{traefik,nginx}
In the traefik folder, we can now create the docker-compose.yml file:
version: '2'
services:
  traefik:
    image: traefik:raclette
    command: --docker
    ports:
      - "80:80"
      - "443:443"
    restart: always
    volumes:
      - "/var/run/docker.sock:/var/run/docker.sock"
      - "./traefik.toml:/traefik.toml"
      - "./acme.json:/acme.json"
    networks:
      - default
Basically what it does is:
- Pull the raclette (1.3) Traefik docker image
- Start the command with the
dockerargument, which enable the Docker backend - Map the port HTTP and HTTPS ports to the host
- Mount the Docker sock (to communicate with the Docker daemon)
- Mount the configuration file and the Let’s Encrypt file
Now we can create the
traefik.tomland theacme.toml
Let’s Encrypt
Traefik uses Let’s Encrypt to generate automated HTTPS certificate for free. For more technical information you can visit the Let’s Encrypt website.
It will generate a certificate for each service we will create, and manage the renewal. The acme.json is here to store these certificates. We could keep it inside the Docker since if it reboots it will regenerate the certificates, however keeping it outside our container is a bit more efficient. (It could also avoid us to reach Let’s Encrypt limits).
The file needs to have only read-write permissions for the current user so let’s create it and set the right permissions:
$ touch acme.json && chmod 600 acme.json
traefik.toml
The Traefik config file is in the toml format. Here is a short example with HTTP redirection to HTTPS and Let’s Encrypt certificate:
# defaultEntryPoints must be at the top
# because it should not be in any table below

defaultEntryPoints = ["http", "https"]

# Entrypoints, http and https
[entryPoints]

# http should be redirected to https
[entryPoints.http]
address = ":80"
[entryPoints.http.redirect]
entryPoint = "https"

# https is the default
[entryPoints.https]
address = ":443"

[entryPoints.https.tls]

# Enable ACME (Let's Encrypt): automatic SSL
[acme]
email = "[email protected]"
storage = "/acme.json"
entryPoint = "https"
onDemand = false
OnHostRule = true

[docker]
endpoint = "unix:///var/run/docker.sock"
domain = "yourdomain.com"
watch = true
exposedbydefault = false
You have to change your email, and the domain name. In this case, I disabled the exposedbydefault so we’ll have to manually tell that a container have to be exposed.
Run it!
Now that we have all the configuration file:
$ ls # in server/traefik
acme.json  docker-compose.yml traefik.toml
we can execute docker-compose up -d.
It will create the Docker container for Traefik and a new network traefik_default.
If we curl the sub domain desired for nginx we get a 404 page not found which indicates that Traefik received the requests but did not found any backend to proxy the request. Let’s set up our nginx container next!
Our first service
We succeeded to set up Traefik, we now have to use it. In order to use the Docker backend, we will use the Docker labels. Here are a few labels:
traefik.backend=examplegives the name example to the generated backendtraefik.port=80which indicates which port Traefik will proxy the requests totraefik.enable=trueenable Traefik on the specified containertraefik.frontend.rule=Host:subdomain.example.comtells Traefik to route all the requests from this sub domain to this container
The full list can be found here.
Here is the docker-compose.yml for the simple nginx container:
version: '2'
services:
  nginx:
    image: nginx:stable
    labels:
      - "traefik.enabled=true"
      - "traefik.backend=nginx"
      - "traefik.frontend.rule=Host:subdomain.example.com"
      - "traefik.port=80"
    restart: always
    networks:
      - traefik_default
networks:
  traefik_default:
    external:
      name: traefik_default
We don’t need the expose the port 80 since Traefik redirects the traffic in the container. And we have to add another network to have the Traefik container and the nginx container in the same network, so they can communicate. Another way would be the add the label traefik.docker.network with the right network name.
Finally you just have to docker-compose up -d and voilà! If you now try to open subdomain.example.com you will be redirected to https://subdomain.example.com with a valid certificate and you can see the nginx page.
A practical example
I’ll show you a quick example with two Docker containers running Flask on test1.ptrk.io and test2.ptrk.io. We need to create a directory test and the following files:
docker-compose.yml
version: '2'

services:
    test1:
        build: .
        labels:
          - "traefik.enabled=true"
          - "traefik.backend=test1"
          - "traefik.frontend.rule=Host:test1.ptrk.io"
          - "traefik.port=5000"
        networks:
          - "traefik_default"
        restart: always
    test2:
        build: .
        labels:
          - "traefik.enabled=true"
          - "traefik.backend=test2"
          - "traefik.frontend.rule=Host:test2.ptrk.io"
          - "traefik.port=5000"
        networks:
          - "traefik_default"
        restart: always
networks:
    traefik_default:
        external:
            name: traefik_default
Dockerfile
FROM python:2.7
WORKDIR /app
COPY . /app
RUN pip install flask
ENTRYPOINT ["python"]
CMD ["start.py"]
start.py
from flask import Flask, request

app = Flask(__name__)

@app.route("/")
def hello():
    return "Hello " + request.host


if __name__ == "__main__":
    app.run(debug=False,host='0.0.0.0')
Now if I run docker-compose up -d I can check test1.ptrk.io and test2.ptrk.io to see that we are correctly redirected to the right container.
Conclusion
You can found out more on the Traefik docs, and in my next post I’ll explain how to access to the Traefik web UI on another sub domain, and with basic HTTP authentication.