Using Drone and Traefik on Kubernetes to deploy a basic application
Drone is a Continuous Delivery system built on container technology. Drone uses a simple YAML configuration file, a superset of docker-compose, to define and execute Pipelines inside Docker containers.
That seems awesome, a CD built with containers in mind. Drone is written in Go, supports a lot of plugins, and is very easy to configure.
If you don’t know Traefik, you can check out my previous posts.
We will deploy Drone on a Kubernetes cluster, here using Google Cloud Platform (You can get free credits for one year). You can choose the provider you prefer, but the instructions may change.
Creation of the cluster
So first thing first, we need a running cluster. With Google Kubernetes Engine, it can be done with a simple command. I assume you have gcloud installed and a working Google Cloud account, if not check the doc here.
In order to create the cluster we just have to type:
$ gcloud container clusters create <cluster-name> --cluster-version=1.8.3-gke.0
Creating cluster <cluster-name>...done.
Created [https://container.googleapis.com/v1/projects/<gcloud-project-name>/zones/<zone-name>/clusters/<cluster-name>].
kubeconfig entry generated for <cluster-name>.
NAME  LOCATION        MASTER_VERSION  MASTER_IP       MACHINE_TYPE   NODE_VERSION  NUM_NODES  STATUS
<cluster-name>  <zone-name>  1.8.3-gke.0     <master-ip>  n1-standard-1  1.8.3-gke.0   3          RUNNING
We will be using Kubernetes 1.8+ so be sure to have the correct kubectl version.
$ kubectl version
Client Version: version.Info{Major:"1", Minor:"8", GitVersion:"v1.8.3+f0efb3cb88375", GitCommit:"f0efb3cb883751c5ffdbe6d515f3cb4fbe7b7acd", GitTreeState:"not a git tree", BuildDate:"2017-11-09T12:38:03Z", GoVersion:"go1.9.2", Compiler:"gc", Platform:"linux/amd64"}
Server Version: version.Info{Major:"1", Minor:"8+", GitVersion:"v1.8.3-gke.0", GitCommit:"86d3ac5eaf57223302c95e7d9fc1aeff55fb0c15", GitTreeState:"clean", BuildDate:"2017-11-08T21:42:58Z", GoVersion:"go1.8.3b4", Compiler:"gc", Platform:"linux/amd64"}
Using Helm to install Traefik
To use Traefik with Let’s Encrypt, the easiest way to install it is via Helm: the Kubernetes Package Manager. You can install it from here.
Once Helm is installed, you can run helm init. It will install Tiller (the cluster-side service) on your cluster.
If you have several clusters, check that kubectl config current-context returns the wanted cluster, if not you can use the --kube-context option from helm to install it on a different one.
Let’s create our Traefik chart configuration. Here is my traefik-helm.yml
imageTag: 1.5
ssl:
    enabled: true
    enforced: true
acme:
    enabled: true
    email: "<your email>"
    staging: false
    persistence.enabled: true
dashboard:
    enabled: true
    domain: "<adress of the dashboard>"
imageTag allows us to specify Traefik’s version, here the latest one. ssl.enabled, well, enables HTTPS while ssl.enforced enables the HTTP to HTTPS redirection.
Next, the acme section is about Let’s Encrypt certificates generation, and the last section is whether or not you would like to set up Traefik’s dashboard. More configuration options can be found here, such as Volume types for persistent storage or connection to Prometheus. Also, I did not specify it, but by default, the replicas count will be one, which is the best option when using Let’s Encrypt for the moment.
We are now ready to run:
$ helm install --namespace kube-system --name traefik --values traefik-helm.yml stable/traefik
Error: release traefik failed: namespaces "kube-system" is forbidden: User "system:serviceaccount:kube-system:default" cannot get namespaces in the namespace "kube-system": Unknown user "system:serviceaccount:kube-system:default"
So that did not work as expected. We need to add a ClusterRoleBinding to add the Role cluster-admin to the ServiceAccount kube-system:default
$ kubectl create clusterrolebinding add-on-cluster-admin --clusterrole=cluster-admin --serviceaccount=kube-system:default
clusterrolebinding "add-on-cluster-admin" created
Now if we retry:
$helm install --namespace kube-system --name traefik --values traefik-helm.yml stable/traefik
NAME:   traefik
LAST DEPLOYED: Sat Dec 16 11:05:39 2017
NAMESPACE: kube-system
STATUS: DEPLOYED

RESOURCES:
==> v1/ConfigMap
NAME             DATA  AGE
traefik-traefik  1     1s

==> v1/PersistentVolumeClaim
NAME                  STATUS   VOLUME    CAPACITY  ACCESS MODES  STORAGECLASS  AGE
traefik-traefik-acme  Pending  standard  1s

==> v1/Service
NAME                       TYPE          CLUSTER-IP     EXTERNAL-IP  PORT(S)                     AGE
traefik-traefik-dashboard  ClusterIP     10.43.254.78   <none>       80/TCP                      1s
traefik-traefik            LoadBalancer  10.43.249.218  <pending>    80:30922/TCP,443:30670/TCP  1s

==> v1beta1/Deployment
NAME             DESIRED  CURRENT  UP-TO-DATE  AVAILABLE  AGE
traefik-traefik  1        1        1           0          1s

==> v1beta1/Ingress
NAME                       HOSTS        ADDRESS  PORTS  AGE
traefik-traefik-dashboard  <dashboard-address>  80       1s

==> v1/Pod(related)
NAME                              READY  STATUS   RESTARTS  AGE
traefik-traefik-6fc99c65d7-qm44j  0/1    Pending  0         1s

==> v1/Secret
NAME                          TYPE    DATA  AGE
traefik-traefik-default-cert  Opaque  2     1s

NOTES:

1. Get Traefik's load balancer IP/hostname:

     NOTE: It may take a few minutes for this to become available.

     You can watch the status by running:

         $ kubectl get svc traefik-traefik --namespace
kube-system -w

     Once 'EXTERNAL-IP' is no longer '<pending>':

         $ kubectl describe svc traefik-traefik --namespace kube-system | grep Ingress | awk '{print $3}'

2. Configure DNS records corresponding to Kubernetes ingress resources to point to the load balancer IP/hostname found in step 1
It worked! We can get the external IP pointing to Traefik by this command (you may need to wait a few seconds):
$ kubectl describe svc traefik-traefik --namespace kube-system | grep Ingress | awk '{print $3}'
35.198.124.40
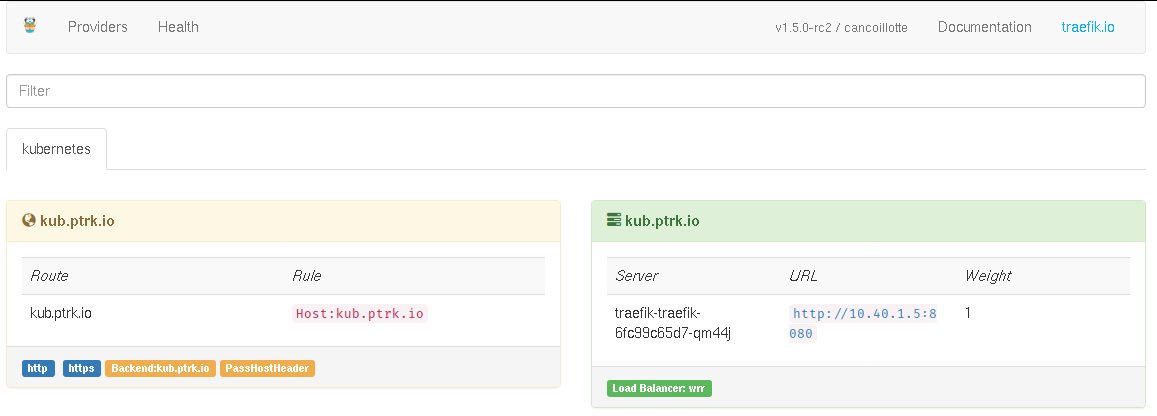
Now we just need to edit our DNS records to match our dashboard’s URL to this IP. Let’s say you have the example.com domain: You will need one A record from this IP to dashboard.example.com, one A record to drone.example.com, and a last to app.example.com. Here is what I get when accessing the dashboard:
Testing Traefik with an example
Now that we have Traefik up and running, and before getting started with Drone, we are just going to deploy a simple application to check if Traefik works as intended.
Here is my basic-deployment.yml:
apiVersion: apps/v1beta2
kind: Deployment
metadata:
    name: nginx
spec:
    selector:
        matchLabels:
            app: nginx
    replicas: 2
    template:
        metadata:
            labels:
                app: nginx
        spec:
            containers:
              - name: nginx
                image: stenote/nginx-hostname:latest
---
apiVersion: v1
kind: Service
metadata:
    name: nginx
    labels:
        apps: nginx
spec:
    selector:
      app: nginx
    ports:
      - protocol: TCP
        port: 80
        name: http
It will create two replicas of a basic NGINX server which prints the hostname. We apply it with:
$ kubectl apply -f basic-deployment.yml
deployment "nginx" created
service "nginx" created
Now we need to create an Ingress to tell Traefik to use this service as the endpoint for the app.example.com URL. Here is my basic-ingress.yml:
apiVersion: extensions/v1beta1
kind: Ingress
metadata:
    name: drone
    annotations:
        kubernetes.io/ingress.class: traefik
spec:
    rules:
      - host: "<your-desired-URL>"
        http:
            paths:
              - path: /
                backend:
                    serviceName: nginx
                    servicePort: http
And we apply it.
$ kubectl apply -f basic-ingress.yml
ingress "drone" created
If we visit and refresh several times this URL, we can see that the hostname is changing. Traefik is working and is correctly redirecting to one of the two replicas created, perfect!
Deploying and configuring Drone
Traefik is working so let’s get to Drone. I will set up Drone with GitHub, but you can do it with GitLab, Gogs, Bitbucket,…Only the environment variables will change. You can find the instructions here.
Configuring a GitHub OAuth
You must go to GitHub > Settings > Developer settings > OAuth Apps and click on New OAuth App. You must complete the form like this (replacing https://drone.foo.com with your URL):
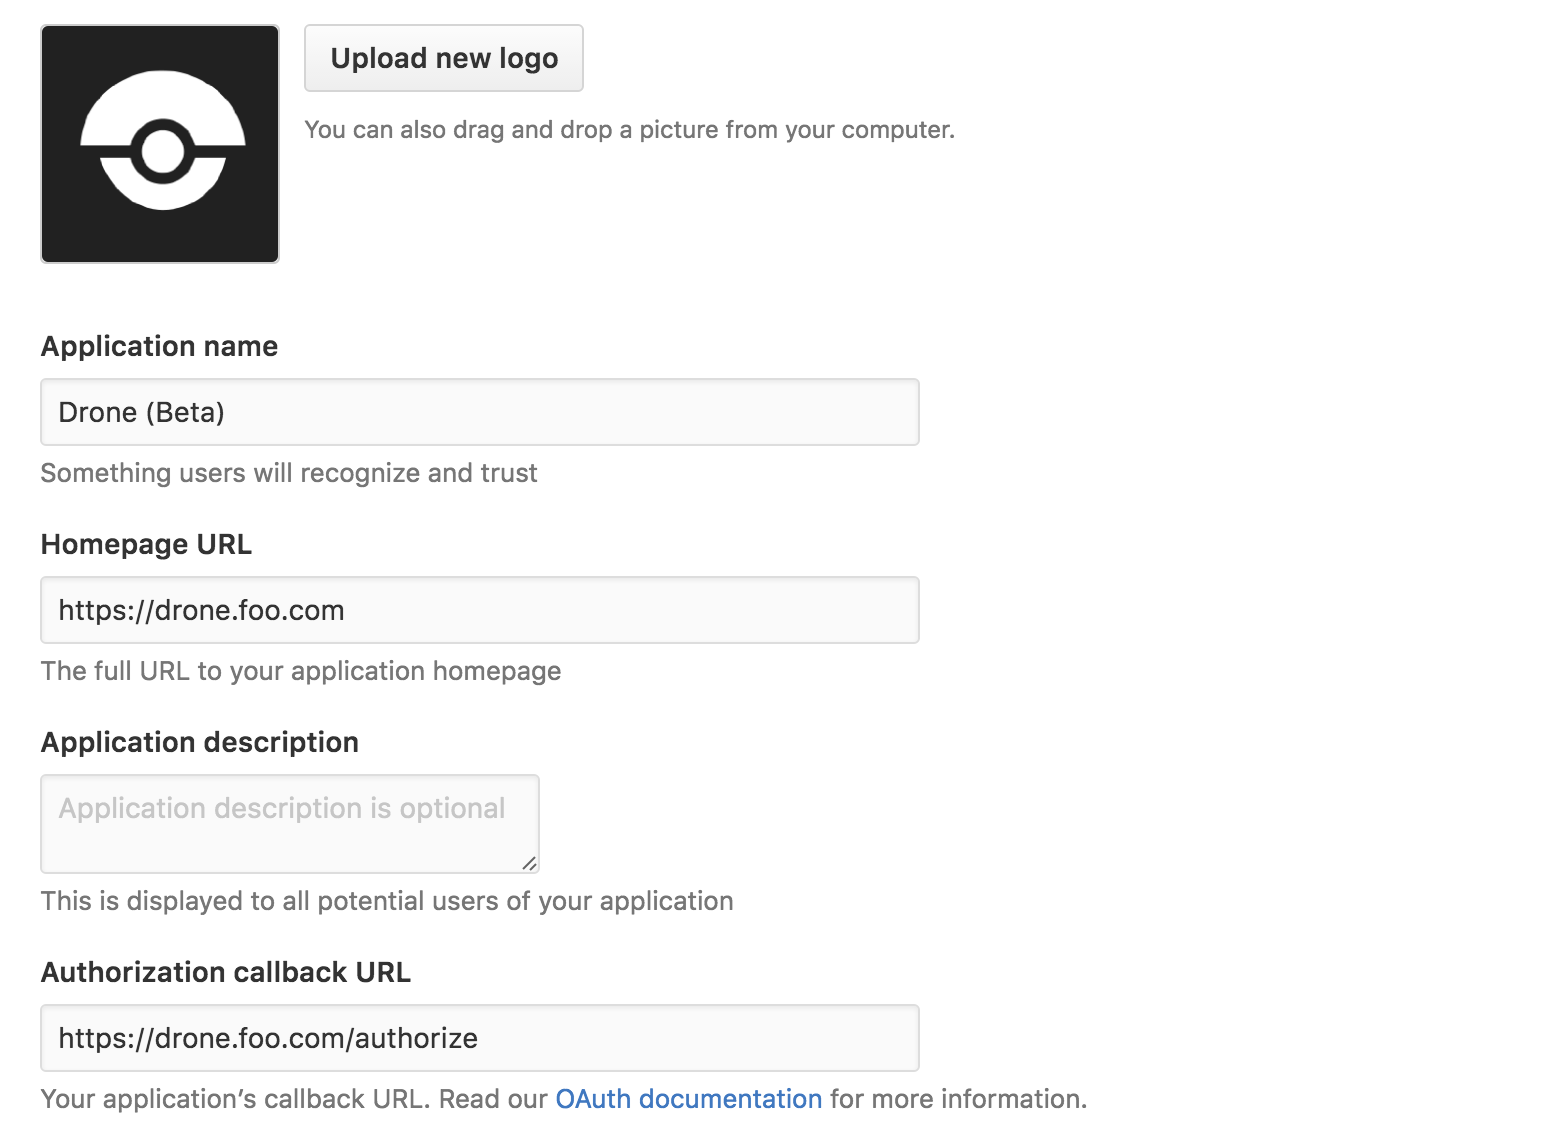
Keep this page open since we will soon need the client and secret key.
Deploying Drone
We will deploy Drone on the K8s cluster, I will group all the necessary Kubernetes objects in one YAML file, but of course you can split it in several files. Here is my drone-k8s.yml.
apiVersion: apps/v1beta2
kind: Deployment
metadata:
    name: drone
spec:
    selector:
        matchLabels:
            app: drone
    replicas: 1
    template:
        metadata:
            labels:
                app: drone
        spec:
            containers:
              - name: drone
                image: drone/drone:0.8
                env:
                  - name: DRONE_OPEN
                    value: "false"
                  - name: DRONE_ADMIN
                    value: "<your-git-username>"
                  - name: DRONE_HOST
                    value: "<your-drone-URL>"
                  - name: DRONE_GITHUB
                    value: "true"
                  - name: DRONE_GITHUB_CLIENT
                    value: "<your-github-client-id>"
                  - name: DRONE_GITHUB_SECRET
                    value: "<your-github-client-secret>"
                  - name: DRONE_SECRET
                    value: "<random-string>"
                ports:
                - containerPort: 8000
                  name: drone-web-port
                - containerPort: 9000
                volumeMounts:
                - mountPath: /var/lib/drone
                  name: drone-db
            volumes:
            - name: drone-db
              hostPath:
                path: /var/lib/drone
---
apiVersion: v1
kind: Service
metadata:
    name: drone
    labels:
        apps: drone
spec:
    ports:
    - name: http
      port: 80
      targetPort: drone-web-port
      protocol: TCP
    - name: agent
      port: 9000
    selector:
      app: drone
---
apiVersion: apps/v1beta2
kind: Deployment
metadata:
    name: drone-agent
spec:
    selector:
        matchLabels:
            app: drone-agent
    replicas: 1
    template:
        metadata:
            labels:
                app: drone-agent
        spec:
            containers:
              - name: drone-agent
                image: drone/agent:0.8
                args: ["agent"]
                env:
                  - name: DRONE_SERVER
                    value: "drone:9000"
                  - name: DRONE_SECRET
                    value: "<same-random-string-as-above>"
                volumeMounts:
                  - mountPath: /var/run/docker.sock
                    name: docker-socket
            volumes:
              - name: docker-socket
                hostPath:
                    path: /var/run/docker.sock
---
apiVersion: extensions/v1beta1
kind: Ingress
metadata:
    name: drone
    annotations:
        kubernetes.io/ingress.class: traefik
spec:
    rules:
      - host: "<your-drone-URL>"
        http:
            paths:
              - path: /
                backend:
                    serviceName: drone
                    servicePort: http
We have one Deployment and one Service for Drone’s server and one Deployment for Drone’s agent. We don’t need any Service for the agent since it does not expose any port. Finally, we have an Ingress for Traefik.
Okay, so now let’s apply it!
$ kubectl apply -f drone-k8s.yml
deployment "drone" created
service "drone" created
deployment "drone-agent" created
ingress "drone" configured
And, ta-da, you can access Drone at the URL you chose!
Using Drone
Now that Drone is working, I will show you how to use it. Drone will build the Dockerfile of my chosen repo, upload it to Dockerhub, tagged with the commit’s hash, and update the deployment on Kubernetes with the new upload image.
First, let’s create the .drone.yml in the repo you want to build.
pipeline:
    docker:
        image: plugins/docker
        repo: <your-username>/<your-repo>
        tags: ${DRONE_COMMIT_SHA:0:8}
        username: <your-username>
        secrets: [ docker_password ]
    deploy:
        image: quay.io/honestbee/drone-kubernetes
        kubernetes_server: ${KUBERNETES_SERVER}
        kubernetes_cert: ${KUBERNETES_CERT}
        kubernetes_token: ${KUBERNETES_TOKEN}
        deployment: <name-of-the-deployment>
        repo: <your-username>/<your-repo>
        container: <name-of-your-container>
        tag:
            - ${DRONE_COMMIT_SHA:0:8}
This file uses two plugins: one to push to Dockerhub and one to update the deployment.
To make it work, we need to add the right secrets. You will need to install the Drone CLI. On Linux, you just have to enter:
$ curl -L https://github.com/drone/drone-cli/releases/download/v0.7.0/drone_linux_amd64.tar.gz | tar zx
$ sudo install -t /usr/local/bin drone
Next step is to get the right tokens: go to your newly created Drone and on the top right click on the menu icon and click on Token.
Copy and paste the first two lines of the Example CLI Usage into your terminal:
export DRONE_SERVER="<your-drone-URL>"
export DRONE_TOKEN="<your-drone-token>"
If it worked, you should get the right output when you type drone info.
Adding secrets to Drone
Before adding any secret to a repo, this one needs to be added through Drone’s UI.
For the first plugin to work, we need to add the docker_password secret:
drone secret add -repository <your-username>/<your-repo> -image plugins/docker -name docker_password -value "<your-dockerhub-password>"
The next plugins uses three different secrets: kubernetes_server, kubernetes_cert, and kubernetes_token.
However, we need to create an RBAC in order the plugin to deploy.
apiVersion: v1
kind: ServiceAccount
metadata:
    name: drone-deploy
    namespace: default
---
apiVersion: rbac.authorization.k8s.io/v1
kind: Role
metadata:
    name: drone-deploy
    namespace: default
rules:
  - apiGroups: ["extensions"]
    resources: ["deployments"]
    verbs: ["get","list","patch","update"]
---
apiVersion: rbac.authorization.k8s.io/v1
kind: RoleBinding
metadata:
    name: drone-deploy
    namespace: default
subjects:
  - kind: ServiceAccount
    name: drone-deploy
    namespace: default
roleRef:
    kind: Role
    name: drone-deploy
    apiGroup: rbac.authorization.k8s.io
And apply it : kubectl apply -f drone-rbac.yml
If you are running K8s on GKE, you need to first add the Role cluster-admin to your gcloud user (see this issue).
$ kubectl create clusterrolebinding <your-user-cluster-admin-binding> --clusterrole=cluster-admin --user=[email protected]
Then we need to extract the ca.crt and the token from the service account.
$ kubectl -n <namespace> get secrets
NAME                       TYPE                                  DATA      AGE
default-token-ms8cl        kubernetes.io/service-account-token   3         3h
drone-deploy-token-4zv8j   kubernetes.io/service-account-token   3         10m
$ kubectl -n <namespace> get secret/drone-deploy-token-4zv8j -o yaml | grep 'ca.crt:'
  ca.crt: <your-crt>
$ kubectl describe secret drone-deploy-token-4zv8j | grep 'token:'
  token: <your-token>
Once this is done, we can create our secrets.
- To get the IP of your master node, you can use the
kubectl cluster-infocommand. And we create the secret withdrone secret add --image=quay.io/honestbee/drone-kubernetes -repository <your-username>/<your-repo> -name kubernetes_server -value "https://<master-ip>" - To create the token secret, we run
drone secret add --image=quay.io/honestbee/drone-kubernetes -repository <your-username>/<your-repo> -name kubernetes_token -value <your-token> - To create the cert token, we run
drone secret add --image=quay.io/honestbee/drone-kubernetes -repository <your-username>/<your-repo> -name kubernetes_cert -value <your-crt>
However, for this plugin to work, the deployment has to be already created. You can check this plugin, if you want Drone to run kubectl apply -f deploy.yml instead of just changing the image of the deployment.
Now, once you push some new code on GitHub, it will trigger Drone and start your build/deployment. Cheers!
kubernetes k8s docker drone traefik
1933 Words
2017-12-18 00:00 (Last updated: 2021-05-02 20:49)
a5cb94c @ 2021-05-02